Thingiverse
Vacuum Valve (Unterdruckventil) 50mm (DN50) +more by agarthand
by Thingiverse
Last crawled date: 3 years ago
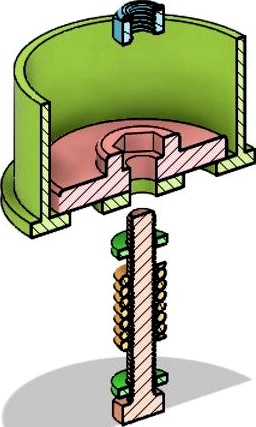
If you are looking for a vacuum valve to be installed directly in your 50mm (DN50) pipe installation you might find this thing very helpful. As an example if you use one of those cyclone dust separaters and fear that your holding tank might get damaged if your airflow is blocked this thing can save your stuff.
The thing consists out of 2 parts that you need to print. In addition you will need: 1x compression spring, 1x M6 bolt, 1x M6 hex nut, optional 2x M6 washers and a gasket (20mm).
Installation is straight forward, install the hex nut in the housing on the smaller part. If you want to install the gasket just glue it to the flush side of the small part. Then put (the optional washers and) the spring onto the bolt and insert it from the front to the bigger part (flush side first). Insert the smaller part (with the nut) to the backside of the bigger part and turn the bolt into the nut. Depending on your spring and vacuum power you have to decide how much pressure is needed to open the valve, simply by locking or loosening the screw and thereof the imposed pressure to the spring. Finally you can just insert the combined thing into your DN50 pipe system. Have fun.
Update 2021-03-07: Added a 75mm (DN75) version of part1 (bigger part) on request of a user. Just combine it with part2 of the DN50 version.
----- German version below -----
Hierbei handelt es sich um ein simples Unterdruckventil, welches direkt in eine DN50 Rohrinstallation eingesetzt werden kann. Dies kann in (selbstgebauten) Absauganlagen sehr hilfreich sein, da hiermit ein Implodieren des Auffanggefäßes, im Falle einer Blockade/Verstopfung, verhindert werden kann.
Einfach beide Teile ausdrucken, zusätzlich benötigt werden: 1x Kompressionsfeder, 1x M6 Schraube (länge Abhängig von genutzter Feder), 1x M6 Mutter (selbstsichernd), optional 2x M6 Unterlegscheiben und eine Dichtung (20mm).
Der Zusammenbau ist schnell erledigt. Die Mutter in die Aussparung des kleineren Teils einsetzen. Wenn Ihr eine Dichtung installieren möchtet dann diese jetzt auf der flachen Seite des kleinen Teils fixieren (anleimen). Hier kann beispielsweise auch ein Moosgummi verwendet werden. Jetzt die Feder auf die Schraube aufsetzen (wenn gewünscht mit Unterlegscheiben beidseitig abstützen) und dann von vorne in das größere Teil einsetzen. Nun das kleinere Teil von der Rückseite (mit der flachen Seite nach vorne) in das größere Teil einsetzen und die Schraube in die Mutter eindrehen. Abhängig von einer genutzten Feder könnt ihr nun über die Vorspannung der Feder das Auslösemoment des Ventils einstellen. Zu guter letzt das ganze einfach in eine DN50 Muffe einsetzen und fertig.
Entsteht nun ein Unterdruck in eurem System wird die Feder und damit der Flansch nach Innen gezogen, damit kann Luft am Ventil vorbei in das System einströmen und der Unterdruck reduziert sich. Sobald die Blockade beseitigt wurde wird das Ventil durch die Feder automatisch wieder verschlossen.
Bei Fragen, oder falls jemand andere Abmessungen (z.B. Schraubendurchmesser oder andere DN Weite) benötigt könnt ihr euch gerne in den Kommentaren melden, ich
versuche dann gerne weiterzuhelfen.
Update 2021-03-07: Auf Request habe ich einmal eine 75mm (DN75) Fassung des "Stopfens" ergänzt. Dazu einfach mit Part2 vom DN50 kombinieren.
Similar models
thingiverse
free

Unterdruckventil DN50 Zylonabscheider by ronny130286
...nötigt:
3x m4x10mm schrauben
1x m5 schraube => länge kann variieren
1x feder
2x u scheiben für m5
1x m5 mutter selbst sichernd
thingiverse
free

CTC - Schalterabdeckung by jojoslf
...e blende dann leichter einbauen. nun kann die blende mit der schraube angebracht werden und dient zukünftig als berührungsschutz.
thingiverse
free

Einwegventil - one way valve by SeinerEiner
...ann die beilagscheibe + mutter aufdrehen.
mit der mutter kann man die kraft einstellen.
kommentare erwünscht ( please comment ).
thingiverse
free

Prusa i3 Bear Upgrade v2.0 auf v2.1 Mod Teile by WowaFix
...ziert, so braucht man bei den tensioner keinen stift, sondern kann einfach eine schraube oder eine schraube mit mutter verwenden.
thingiverse
free

Filamentreinigungsschraube 3/8" (Filament Screw) für Prusa i3 Hephestos und ähnliche by Dr_Peacock
...zette zum platzieren in der schraube. siehe fotos.
die schrauben nur handfest anziehen!
update: schraube richtig ausgerichtet.
thingiverse
free

Löwen Dart SM94 - Fuß_Standfuß by ThomasBr
...: 2 muttern, 17er schlüssel, rohzange)https://youtu.be/yzvfs_kzl4y
neue füße auf automat aufschraubenhttps://youtu.be/7716bvfibus
thingiverse
free

Geeetech I3 Pro Acryl Filamenthalter by Irengard
...tange das dann von den anbauteilen aufgefangen werden muss. die rohrverbinder und die schraubnippel hab ich 30% füllung gedruckt.
thingiverse
free

Kindle and Tablet holder by jausems
...n und die teile oder das holz müssen teilweise etwas nachgeschliffen werden.
update:
aussparung für usb anschlusskabel eingebaut.
thingiverse
free

Getmakerstuff Upgrade Sehne Spule Mittenwicklungsgegrät by Wibo2006
...mutter dann die klemmung der rolle eingestellt, um die wicklung entsprechend anzupassen und damit straffer oder loser zu wickeln.
thingiverse
free

Carrera Digital 132/124 Startampel Cover by DerBock
...inieren, dann kann sie beleuchtet in der brücke der ampel eingeklebt werden.
die ampel hat eine breite von 40cm.
viel spaß damit!
Unterdruckventil
thingiverse
free

Zyklon Unterdruckventil - Cyclone vacuum valve by Goodcat
...cuum valve for a cyclone separator. it can be adjusted by means of the spring and prevents the implosion of your collection drum.
thingiverse
free
Unterdruckventil DN50 Zylonabscheider by ronny130286
...nötigt:
3x m4x10mm schrauben
1x m5 schraube => länge kann variieren
1x feder
2x u scheiben für m5
1x m5 mutter selbst sichernd
thingiverse
free

DN50 Unterdruckventil / DN50 Vacuum valve by daschaefe
...that fits over the m5 screw, if necessary shorten it yourself)
price ? including filament not more than 6 euro.
have fun with it!
Agarthand
thingiverse
free

osVAC Adapter M32-Abdeckkappe by agarthand
...hobbyhimmel/collections/osvac-adapter
weitere designs (auch osvac adapter) von mir: https://www.thingiverse.com/agarthand/designs
thingiverse
free

osVAC Adapter M32-R44 / R48 by agarthand
...hobbyhimmel/collections/osvac-adapter
weitere designs (auch osvac adapter) von mir: https://www.thingiverse.com/agarthand/designs
thingiverse
free

osVAC Adapter F32-R50 by agarthand
...hobbyhimmel/collections/osvac-adapter
weitere designs (auch osvac adapter) von mir: https://www.thingiverse.com/agarthand/designs
thingiverse
free

osVAC Adapter M32-R39/R44 by agarthand
...hobbyhimmel/collections/osvac-adapter
weitere designs (auch osvac adapter) von mir: https://www.thingiverse.com/agarthand/designs
thingiverse
free

Quick Ratcheting Bar F-Clamp centering Cap for Pipes by agarthand
...ipes" from @nextstep i created this design to fit on my bigger quick f-clamps (rail width 24mm, length 40mm, thickness 5mm).
thingiverse
free

osVAC H32 - Bosch GAS (35 M AFC) by agarthand
...hobbyhimmel/collections/osvac-adapter
weitere designs (auch osvac adapter) von mir: https://www.thingiverse.com/agarthand/designs
thingiverse
free

osVAC Adapter M32-DN50 by agarthand
...hobbyhimmel/collections/osvac-adapter
weitere designs (auch osvac adapter) von mir: https://www.thingiverse.com/agarthand/designs
thingiverse
free

Triton Collet storage holder by agarthand
...o see a different version (more collet slots? no or different text labels?) just log a comment and describe your needs. have fun.
thingiverse
free

osVAC F32 - Bosch Click & Clean by agarthand
...ktur notwendig). aus diesem grund befindet sich auf dem osvac adapterteil auch die nicht mehr ganz passende f32-h32 beschriftung.
thingiverse
free

osVAC M32 - Bosch GTS 635-216 machine adapter by agarthand
...mmel/collections/osvac-adapter
weitere designs (auch andere osvac adapter) von mir: https://www.thingiverse.com/agarthand/designs
Dn50
3d_export
$60

gate valve handwheel water dn40 to dn500
...>dn100<br>dn125<br>dn150<br>dn200<br>dn250<br>dn300<br>dn350<br>dn400<br>dn500
thingiverse
free

DN50 Pipe Cap
...dn50 pipe cap
thingiverse
a simple cap for a dn50 pipe
thingiverse
free

DN50 Pipe Cap
...dn50 pipe cap
thingiverse
a simple cap for a dn50 pipe
thingiverse
free

Fan 80mm to DN50 by Edd77
...fan 80mm to dn50 by edd77
thingiverse
fan 80mm to dn50
thingiverse
free

DN50 mount by DiscoStuso
...lips for dn50 pipes.
use a m4 screw and nut.
i built in my vacuum under my workbench and used this clips to mount some dn50 pipes
thingiverse
free

BOSCH C35 to DN50 / BOSCH C35 auf DN50 by Boschlike
... you can use it for a cylone cleaner.
adapter vom bosch c35 system auf ein dn50 rohr. passt auch ideal zu einem zyklonanscheider.
thingiverse
free

BOSCH vacuum cleaner pipe to DN50 / BOSCH Staubsaugerschlauch auf DN50 by Boschlike
...like
thingiverse
direct adapter from bosch vacuum cleaner pipe to dn50 / direkter adapter vom bosch staubsaugerschlauch auf dn50
thingiverse
free

Pipe Clamp / Rohrschelle DN50
...pipe clamp / rohrschelle dn50
thingiverse
pipe clamp for a dn50 pipe to replace a broken one.
thingiverse
free

Barrel connection for Rainwater DN50 by Edd77
...barrel connection for rainwater dn50 by edd77
thingiverse
barrel connection for rainwater dn50
thingiverse
free

Thing ico BOSCH vacuum cleaner pipe to DN50 / BOSCH Staubsaugerschlauch auf DN50 by Boschlike
...like
thingiverse
direct adapter from bosch vacuum cleaner pipe to dn50 / direkter adapter vom bosch staubsaugerschlauch auf dn50
Vacuum
archibase_planet
free

Vacuum cleaner
...cuum cleaner vacuum hoover exhauster
vacuum cleaner stefano galli n250213 - 3d model (*.gsm+*.3ds) for interior 3d visualization.
3d_export
$12

vacuum cleaner
...vacuum cleaner
3dexport
vacuum cleaner fo houses
3ddd
$1

Vacuum Cleaner
...vacuum cleaner
3ddd
пылесос
vacuum cleaner + obj + textures
3d_export
$170

VACUUM BOWL
...vacuum bowl
3dexport
3d_export
$5

Bracket vacuum 3D Model
...bracket vacuum 3d model
3dexport
vacuum
bracket vacuum 3d model bkl1989 63086 3dexport
3d_export
$50

Vacuum Cleaner 3D Model
...vacuum cleaner 3d model
3dexport
vacuum cleaner
vacuum cleaner 3d model kaxa3d 12593 3dexport
archive3d
free

Vacuum cleaner 3D Model
...er
vacuum cleaner stefano galli n250213 - 3d model (*.gsm+*.3ds) for interior 3d visualization.
3d_export
$5

vacuum cleaner
...vacuum cleaner
3dexport
diameter 32 mm
turbosquid
$69

vacuum furnaces
... available on turbo squid, the world's leading provider of digital 3d models for visualization, films, television, and games.
turbosquid
$59

Vacuum Italian
... available on turbo squid, the world's leading provider of digital 3d models for visualization, films, television, and games.
50Mm
3d_ocean
$9

50mm Canon lens
...50mm canon lens
3docean
50mm canon foto lens photo
canon lens 50mm 1.8 the most practical affordable lens to start with
3d_export
$20

50mm cal 3D Model
...50mm cal 3d model
3dexport
50mm cal bullet ammo
50mm cal 3d model archer 23592 3dexport
turbosquid
$1

Base insert - Stone&Wood 50mm
...e 3d model base insert - stone&wood 50mm for download as on turbosquid: 3d models for games, architecture, videos. (1325614)
turbosquid
$7

Grenade Launcher Ammo Type 91 50mm
... available on turbo squid, the world's leading provider of digital 3d models for visualization, films, television, and games.
turbosquid
$19

Lensbaby Composer Double Glass 50mm lens
...lass 50mm lens for download as ma, max, ma, dae, fbx, and obj on turbosquid: 3d models for games, architecture, videos. (1523910)
3ddd
$1

объектив Canon EF 50mm f-1.2L USM
... canon
объектив canon ef 50mm f-1.2l usmhttp://market.yandex.ru/model.xml?modelid=988322&hid;=90613
turbosquid
$5

SOCKET HEAD CAP SCREW M7 LENGTH-50mm
...screw m7 length-50mm for download as sldpr, sldpr, stl, and x on turbosquid: 3d models for games, architecture, videos. (1677023)
turbosquid
$19

Lens Sigma 17-50mm F2.8 EX OS
... available on turbo squid, the world's leading provider of digital 3d models for visualization, films, television, and games.
3d_export
$12

nissan skyline r33 50mm over fenders
...late gtr width<br>model format ready obj, fbx, 3ds, 3ds max 2015-2018<br>poly's - 8790<br>vert's - 7578
turbosquid
$19

Samsung 16-50mm f/2-2.8 S ED OIS Lens
... available on turbo squid, the world's leading provider of digital 3d models for visualization, films, television, and games.
Valve
3d_export
$5

Valve
...valve
3dexport
diverter valve
3d_export
$5

valve
...valve
3dexport
this is a 3d model of a valve available in all formats.
3d_export
free

valve
...valve
3dexport
simple valve 3d model, more free models here:
3d_export
$20

gate valve
...gate valve
3dexport
gate valve
3d_export
$10

stop valve
...stop valve
3dexport
stop valve
3d_export
$5

ball valve
...ball valve
3dexport
ball valve
3ddd
$1

valve 02
...valve 02
3ddd
клапан
water valve
3ddd
$1

Valve 01
...valve 01
3ddd
клапан
water valve
turbosquid
$19

Valve
...royalty free 3d model valve for download as ige, obj, and stl on turbosquid: 3d models for games, architecture, videos. (1425806)
3d_export
$5

Valve
...exture for quick import. available formats fbx, obj. vertices - 3,741 fases - 3,697 textures 2048x2048 created in blender 3.1.2
More
turbosquid
$15

more
... available on turbo squid, the world's leading provider of digital 3d models for visualization, films, television, and games.
3ddd
free

more
...more
3ddd
amore , шкаф
шкаф amore abj 301
turbosquid
$49

Thomas More
...osquid
royalty free 3d model thomas more for download as fbx on turbosquid: 3d models for games, architecture, videos. (1617580)
turbosquid
$15

Visign for More
... available on turbo squid, the world's leading provider of digital 3d models for visualization, films, television, and games.
turbosquid
$15

Table - Moree
... available on turbo squid, the world's leading provider of digital 3d models for visualization, films, television, and games.
3ddd
free

Glam-More Caracole
...glam-more caracole
3ddd
glam-more , тумба
размеры: 37w x 18d x 32h
design_connected
free

The More, The Merrier Candlestick
...e merrier candlestick
designconnected
free 3d model of the more, the merrier candlestick by muuto designed by campbell, louise.
turbosquid
$27

fantasy plants and more
...d model fantasy plants and more for download as blend and obj on turbosquid: 3d models for games, architecture, videos. (1711843)
3ddd
$1

Betibu Chairs & More
...betibu chairs & more
3ddd
chairs&more
.betibu chairs & more
turbosquid
$139

AW139(more accurate)
... available on turbo squid, the world's leading provider of digital 3d models for visualization, films, television, and games.