Thingiverse
Small Bench Top Power Supply
by Thingiverse
Last crawled date: 4 years, 2 months ago
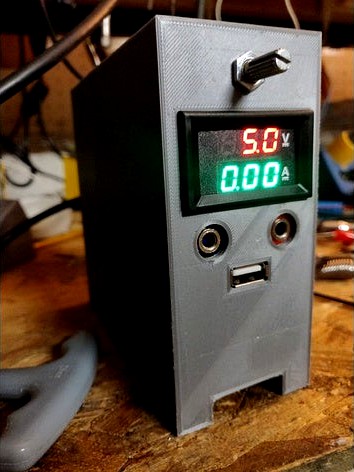
Small benchtop 3a power supply able to be printed (barely) on a monoprice select mini.
Bill of Materials:
B10K potentiometer
xl2001-5v usb buck converter
dns-vc288 voltmeter / anmeter led display
3a LM2596 buck converter
Male Power Socket with Fuse and Switch 10A 250V 3 Pin IEC320
3a fast blow fuse
spade connectors for power
wire
3mm cap head screws (8) and 3mm hex nuts (6)
clone dell pa9 laptop power supply (outer dimensions of plastic case 50x30x126mm)
High Level Instructions:
I'm not going to provide a full schematic, anyone doing this should have a good working knowledge of electricity, if you don't enlist the help of someone who does.
The 3a buck converter needs to have the onboard pot desoldered and replaced with wires attached to the b10k pot. Only two leads are required the third one on the board isn't connected. Make sure you wire it up so that turning the pot clockwise increases the voltage. The buck converter hangs upside down on the top of the case. When the front and back of the case is assembled, the buck converter is captive, no additional screws required. Note: There are three different versions of this board, they are very similar, but have slightly different dimensions. Get the one pictured if you can otherwise the dimensions must be changed to fit.
The usb charger should be directly connected to DC power, it's not variable power or connected to the meter like the banana plugs. It's just a bonus, it's nice to have a USB charger handy. Two 10-15mm x 3mm screws and the printed usb cover will hold it in place.
Wire up the power outlet with heavy gauge wire and spade plugs. I wired mine so that the switch is only lit when the switch is turned on.
The dsn-vc288 meter should be the very last thing you install, you will need the front space open to install the banana plugs and the pot. Small fingers would help. Installation is not quite a one-way operation, but it's not easy to get it out of the case once inserted. I wired mine up with power coming direct off the dc power supply and power to the banana plugs is monitored. There's a good explanation at the following link, make sure to find the dsn-vc288 section.http://hamguyparts.com/files/Download/Chinese%20DVA.pdf
The banana plugs are the cheapest smallest available on ebay. There are binding posts that look similar, they may fit, but I haven't tested it as I don't have them. To insert the banana plug jacks, you need to take off one plastic surround and push them in. Solder the wires on the tabs, and rotate the tabs outwards and down so that they won't make contact with anything else.
The power adapter I used is a dell pa9 19.5v 4.5a chinese clone. It appears that other clone 19.5v laptop adapters have the same form factor. I measured the outside of the plastic case at 50x30x126mm. The "mickey mouse" plug must be desoldered and the dc wire removed. Line and neutral should go to the power plug switch. Ground goes to the ground tab. Fit is tight in the printed case, but there is a slight bit of wiggle room.
For final assembly, some long 3mm screws would be helpful for inserting the nuts into the appropriately shaped cutouts. Insert the nuts before you put the front and back case together, having that long screw will help to draw the nut in. Once the nuts are in place, assemble the case and fasten the case together with 4 3mm screws.
I suggest printing this in ABS or PETG for temperature resistance, but mine is in PLA. There is no venting on here, I don't know how hot this will get if driven at it's limits, but the power supply never got terribly hot driving my laptop. It wouldn't be too bad to add a small 24v fan if it needs it.
You can print with supports, the only place they should be used is in the banana plug holes. Everything else is designed (at great effort) to print with no supports.
None of these parts should cost much more than $2 each if you are willing to wait for shipping from china. I think I have $10-12 in this in parts (don't ask how long I spent designing it) and the power supply was sitting in my junk box with a broken cord.
Similar models
thingiverse
free

Buck Converter Case by Benvolio28
...ly.
i used this buck converter: https://www.amazon.com/gp/product/b01hm12n2c/ref=ppx_yo_dt_b_asin_title_o00_s00?ie=utf8&psc=1
thingiverse
free

USB plug mount by Jwnok
...ected to the power supply of your printer. the actual chip can be purchased (see link below) and you need a few m2 and m3 screws.
thingiverse
free

Snapmaker 2.0 power supply fan 40x20 upgrade by AliSanjabi
...ach to case: 4 2x8 mm
screws to attach fan: 4 3x15mm + 4 3mm nuts
you can use the existing screws if you counter sink the holes.
thingiverse
free

DIY ATX Lab Bench Power Supply by sg_dev
...some dimensions for your psu you are using / want to use a different buck-boost converter / you want to improve the design etc ;)
thingiverse
free

ZK-4KX Buck Boost Power Supply Case by adinardi
... converter power supply
the power supply slides in to the case and stays in with some friction. the wiring terminals remain open.
thingiverse
free

ATX Bench Power Supply
... power supply
upgrade dps 5005 to opendps
now that it's all working as expected, next is to update the dps
atx power pin out
thingiverse
free

HW-468 buck converter enclosure by ThomasRagos
...m my ender 3 pro's power supply.
you will need one m4x6 screw & t-nut to mount it and 3 tapping screws (3x8) for the cap.
thingiverse
free

Buck Converter Case by PancakeLegend
...y want to adjust the screw hole size to meet your printer's tolerances. the buck converter mount holes can support m3 screws.
thingiverse
free

Buck Board Converter Case
...ed any t-slot nuts to print for attaching to your extruded aluminum frame, leave me a comment and i can provide the size you need
thingiverse
free

Arduino Uno case plus battery and buck/boost by wimberleytech
...wer uno through switch. data does not connect from usb micro to the power supply, otherwise, i would have wired data across too.
Supply
3d_export
$5

black supply
...black supply
3dexport
black supply size: 57.9 x 29.2 x 34 sm
turbosquid
$20

Office Supplies
...lty free 3d model office supplies for download as max and obj on turbosquid: 3d models for games, architecture, videos. (1273636)
3d_export
free

office supplies
...office supplies
3dexport
turbosquid
$8

Supply Drop
...e 3d model supply drop for download as fbx, obj, dae, and stl on turbosquid: 3d models for games, architecture, videos. (1663721)
turbosquid
$75

Supply Helicopter
... available on turbo squid, the world's leading provider of digital 3d models for visualization, films, television, and games.
turbosquid
$65

Supply Ship
... available on turbo squid, the world's leading provider of digital 3d models for visualization, films, television, and games.
turbosquid
$19

Power Supply
... available on turbo squid, the world's leading provider of digital 3d models for visualization, films, television, and games.
turbosquid
$5

school supplies
... available on turbo squid, the world's leading provider of digital 3d models for visualization, films, television, and games.
3d_export
$10

Supply air duct
...supply air duct
3dexport
supply air duct with two axial fans and hangers
3d_ocean
$15

Office Supplies Pack
...e dispenser eraser markers office paper pencils pens scissors stapler supplies tape tools work
pack of different office supplies.
Bench
3ddd
$1

bench
...bench
3ddd
bench
bench
3d_export
$6

Bench
...bench
3dexport
bench of
3d_export
$5

bench
...bench
3dexport
bench
3d_export
$5

bench
...bench
3dexport
bench
3d_export
$5

Bench
...bench
3dexport
bench
3d_export
free

Bench
...bench
3dexport
bench
archibase_planet
free

Bench
...bench
archibase planet
bench seat garden bench
bench 2 - 3d model (*.gsm+*.3ds) for exterior 3d visualization.
archibase_planet
free

Bench
...bench
archibase planet
bench seat garden bench
bench n210815 - 3d model (*.gsm+*.3ds+*.max) for exterior 3d visualization.
3d_export
$5

bench
...bench
3dexport
modern bench
3d_export
$5

bench
...bench
3dexport
wooden bench
Power
turbosquid
$100

power
...ower
turbosquid
royalty free 3d model power for download as on turbosquid: 3d models for games, architecture, videos. (1421990)
3d_export
$5

Power
...power
3dexport
3d_export
$5

power outlets
...power outlets
3dexport
power outlets
3ddd
$1

lion power
...lion power
3ddd
лев , статуя
lion power gold sculpture
3ddd
$1

Sea Power
...
компас , море , часы
часы с компасом sea power
3ddd
free

Meridiani / Power
...power
3ddd
meridiani , круглый
стол power производитель meridiani, диаметр 120,высота 67
3d_export
$5

Power Surge
...power surge
3dexport
the power surge is a all mesh carnival ride to lower in game part count and lag
turbosquid
$8

Airport Ground Power Unit (AXA Power )
... available on turbo squid, the world's leading provider of digital 3d models for visualization, films, television, and games.
turbosquid
$50

Power Houser
...rbosquid
royalty free 3d model power houser for download as on turbosquid: 3d models for games, architecture, videos. (1333800)
3d_export
$5

power outlet
...power outlet
3dexport
power outlet<br>format file maya 2018, 3d max 2017, obj, fbx
Small
3d_export
$10

small bed
...small bed
3dexport
small bed design for small house or small room with storage
3d_export
$10

small house
...small house
3dexport
a small house. the project of a small country house.
3d_ocean
$4

Small Cake
...small cake
3docean
cake food small
just a small cake ready for render
3d_export
$6

small armchair
...small armchair
3dexport
small armchair
3d_export
$5

a small world
...a small world
3dexport
a small world
3d_export
$5

small room
...small room
3dexport
small cozy room
3d_export
$5

small tank
...small tank
3dexport
small tank modeling in blender
design_connected
free

small lounge
...small lounge
designconnected
free 3d model of small lounge
design_connected
$11

Watermelons Small
...watermelons small
designconnected
watermelons small computer generated 3d model.
3d_export
$5

small house
...small house
3dexport
a small cozy house on the foundation, the interior is missing.
Top
archibase_planet
free

Top
...top
archibase planet
top
top - 3d model (*.gsm+*.3ds) for interior 3d visualization.
3ddd
free

Range Top V36C top
...range top v36c top
3ddd
гриль
проф. гриль range top v36c top
archibase_planet
free

Top
...top
archibase planet
dresser kitchen furniture
top - 3d model (*.gsm+*.3ds) for interior 3d visualization.
archibase_planet
free

Top
...top
archibase planet
bracket bar furniture
bar top - 3d model (*.gsm+*.3ds) for interior 3d visualization.
turbosquid
$5

Top
...lty free 3d model top for download as ma, max, blend, and obj on turbosquid: 3d models for games, architecture, videos. (1579951)
turbosquid
$39

Top
... available on turbo squid, the world's leading provider of digital 3d models for visualization, films, television, and games.
turbosquid
$30

Top
... available on turbo squid, the world's leading provider of digital 3d models for visualization, films, television, and games.
3d_export
$15

top knifle
...top knifle
3dexport
top knifle
design_connected
$11

Drop Top
...drop top
designconnected
plumen drop top computer generated 3d model.
3d_export
$245

top of the material
...top of the material
3dexport
top of the material,commercial ceiling ceiling material, metal material