Thingiverse
Controlling a Servo from the Mavic Air Controller by daniedb
by Thingiverse
Last crawled date: 3 years ago
This project was only to see if it will work, and now I see a few possibilities for this.
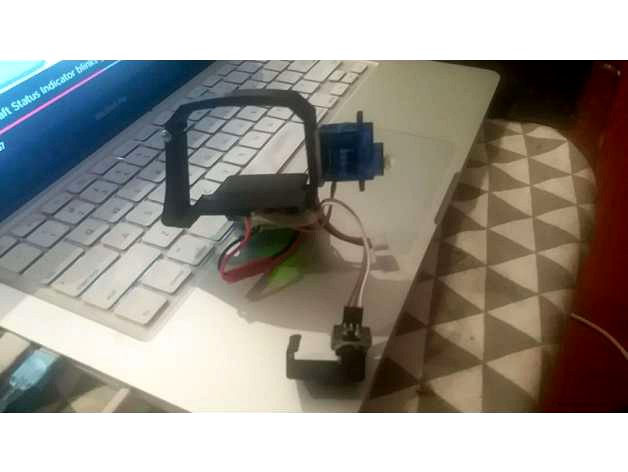
HOW IT WORKS.
Actually this is very straight forward, on the inner workings of this unit.
I’m using the Mavic Air front Lights to control the Servo
In DJI go 4 App, you can assign funtions to the “C” and “Fn” buttons on the controller
STEP 1:
In the DJI Go 4 App, goto the Remote Controller settings, and assign “Turn on/off head
LED’s” to “Fn” or “C” switches.
STEP 2:
Building the Arduino Unit
What you will need.
3D Printer or ask a friend
1 x Photo Resistor
1 x 10K resistor 1/4W
1 x Arduino Pro Mini
1 x 7.2v 2S Lipo 200-500mah
Some knowledge on how to program an arduino Pro Mini using the Arduino IDE
(www.arduino.cc)
#include
int HighValue = 800; //Change this to adjust sensitivity for your sensor
int SensorPin = A0;
int ServoMin = 90;
int ServoMax = 175; // change this for servo arm movement
int ServoPin = 9;
int delayValue = 10;
Servo myservo; // create servo object to control a servo
void setup() { // Serial monitor to read value
Serial.begin(9600);
myservo.attach(ServoPin);
}
void loop() {
Serial.println(analogRead(SensorPin));
if (analogRead(SensorPin) > HighValue){
myservo.write(ServoMin);
}else{
myservo.write(ServoMax);
}
delay(delayValue);
}
Similar models
thingiverse
free

DJI Mavic Air 2 Drop System by greylingj77
...
+ photo light resistor
+ vertical slide switch
+ led
+ 3/4 in velcro
+ electric wire
video overview:https://youtu.be/ji68btj_xhq
grabcad
free

Automatic fish food feeder Arduino based
...oop()
{
switch(i%2)
( case 0:
myservo.write(180);
delay(10000);
break;
case 1:
myservo.write(90);
delay(7200000);
break;
}
i++
}
thingiverse
free

DJI Mavic Pro Charger Cover by voided
...dji mavic pro charger cover by voided
thingiverse
dji mavic pro charger cover.
thingiverse
free

DJI mavic mini controller, gimbal wheel other design
...ingiverse
dji mavic mini, controller gimbal wheel other design
see this for teardown https://www.youtube.com/watch?v=x-rokregzru
thingiverse
free

ARMDUINO V1 Open-Source Robotic Arm! by Doctorfizzle
...urnval);
analogwrite(led1, turnval / 8 - 120);
analogwrite(led2, firstval / 8 - 120);
analogwrite(led3, secondval / 8 - 120);
}
grabcad
free

DJI Mini 2 Controller Senderpult
...controller senderpult
grabcad
dieses 3d modell ist ist kompatibel mit dem controller der dji mini 2, dji mavic air 2 und air 2s.
thingiverse
free

DJI Mavic PRO Controller Botton by Arty_lk
...dji mavic pro controller botton by arty_lk
thingiverse
dji mavic pro control button
thingiverse
free

Servo mount to push away the infoscreen
.../ tell servo to go to position in variable 'pos'
delay(15);// waits 15ms for the servo to reach the position
exit(0);
}
}
thingiverse
free

Arduino filastruder filiment guide with servo mount by stefi01
...ition,servospeeds) ;
}
else if( myservo.read() == servomaxposition)
{
myservo.slowmove(servominposition,servospeeds) ;
}
}
cg_trader
$5

DJI Mavic Pro Controller for Element 3D
... element element 3d gadget motion graphics videocopilot dji controller dji mavic pro controller dji mavic pro other after effects
Daniedb
thingiverse
free

Transmitter Stand by daniedb
...mitter stand by daniedb
thingiverse
radio control tx (transmittor) stand. will fit most radios. designed for spektrum/jr radios.
thingiverse
free

Bird Cage Food Bucket by daniedb
...bird cage food bucket by daniedb
thingiverse
small food bucket for bird cage
70mm x 40mm x 26mm
thingiverse
free

Servo Extension Lead Lock Clip by daniedb
...ervo extension lead lock clip by daniedb
thingiverse
never loose a servo connection again.
use when connecting servo extensions.
thingiverse
free

I Love You - Valentine Cookie Cutter by daniedb
...i love you - valentine cookie cutter by daniedb
thingiverse
i love you - valentine cookie cutter
thingiverse
free

Mavic Air, Various Brackets for Mounting by daniedb
...ckets for mounting by daniedb
thingiverse
brackets for the dji mavic air.
can be used/modified to add various items to mavic air
thingiverse
free

Minimalistic Mk7 replacement with Filament Guide by daniedb
...listic mk7 replacement derived from thingiverse.com/thing:15718 with a filement guide for more accurate feeding on the drive gear
thingiverse
free

Balsa Wood Stripper/Cutter by daniedb
...o cut your balsa wood in strips, from 5-30mm width.
printed on the 100x100mm thing-o-matic 3d printer , with black abs, 20% fill.
thingiverse
free

3D Printed Panoramic Head by daniedb
...odal point of your camera.
this is build for my small canon c610 snap-and-shoot camera, and should work with most smaller cameras
thingiverse
free

HSP 1/10 Scale Nitro Truck Left/Right Lower Arms by daniedb
...hsp 1/10 scale nitro truck left/right lower arms by daniedb
thingiverse
lower arms for the the hsp 1/10 scale nitro truck
thingiverse
free

e3D/Jhead All Metal Hotend, Fan Holder for 40mm fans by daniedb
...original design by dtteacherfromhellhttp://www.thingiverse.com/thing:52506
this version use a 40x40mm fan cooling the extruder
Mavic
3d_export
$5

drone mavic
...drone mavic
3dexport
turbosquid
$49

Mavic DeeMax Wheelset
... available on turbo squid, the world's leading provider of digital 3d models for visualization, films, television, and games.
3d_export
$79

dji mavic 2
...ilable: 3dsmax 2012, 3ds, fbx, obj, c4d, dae, wrl<br>- vray and standar materials .max versions<br>thanks for reading
turbosquid
$1

DJI Mavic Pro Remote Controller Neck Strap Hanging Buckle Bracket Adapter
...ap hanging buckle bracket adapter for download as max and obj on turbosquid: 3d models for games, architecture, videos. (1200579)
3d_export
$149

high detailed of dji mavic 3
...ders need to be edited for the new studio for the final rendering. we tried to create a 3d model most similar to the real object!
3d_export
$5

camera holder for dji mavic pro
... camera, you will also need a standard 1/4-inch short screw. as well as two m3.5 x 5 screws (from the back cover of the computer)
3d_export
$29

dji mavic pro 2 zoom
...deling and texturing.<br>please font’t forget to rate this item if you liked him.<br>kind regards<br>owl3d team
3d_export
$99

dji collection
...inspire 1 and inspire 2<br>- dji phantom 4<br>- dji mavic pro<br>- this 3d model detailed enough for close-up renders<br>-...
thingiverse
free

MAVIC PRO LANDING GEAR (not mavic 2)
...mavic pro landing gear (not mavic 2)
thingiverse
9g light weight extended landing gear for your mavic pro
thingiverse
free

dji mavic by shura2000
...dji mavic by shura2000
thingiverse
dji mavic
Servo
turbosquid
$30

Servo
...d model servo for download as obj, blend, dae, stl, and sldpr on turbosquid: 3d models for games, architecture, videos. (1394011)
3d_export
$5

servo motor
...tor
3dexport
it's a simple part of servo motor 0.75kw for used in machines assembly to show specified motor in own project.
turbosquid
$1

Servo Moter
...quid
royalty free 3d model servo moter for download as blend on turbosquid: 3d models for games, architecture, videos. (1650816)
turbosquid
free

Motor/Servo
...osquid
royalty free 3d model motor/servo for download as obj on turbosquid: 3d models for games, architecture, videos. (1522522)
turbosquid
$60

Servo Skull
...
royalty free 3d model servo skull for download as ma and fbx on turbosquid: 3d models for games, architecture, videos. (1318573)
3d_export
$5

Servo 3D Model
...rvo 3d model
3dexport
servo
servo 3d model download .c4d .max .obj .fbx .ma .lwo .3ds .3dm .stl pasqualesiciliano 104590 3dexport
turbosquid
$50

Servo Motor
... available on turbo squid, the world's leading provider of digital 3d models for visualization, films, television, and games.
turbosquid
$49

Servo Motor
...model servo motor for download as 3ds, max, obj, fbx, and stl on turbosquid: 3d models for games, architecture, videos. (1324153)
turbosquid
$29

Servo Set
... available on turbo squid, the world's leading provider of digital 3d models for visualization, films, television, and games.
turbosquid
$10

machine servo
... available on turbo squid, the world's leading provider of digital 3d models for visualization, films, television, and games.
Controller
3d_ocean
$4

Controller TQFP32
...qfp32
3docean
chip controller cpu electronic gpu mcu micro controller silicon smd tqfp wafer
a micro controller in tqfp32 package
3d_ocean
$4

Controller TQFP44
...44
3docean
chip controller cpu electronic gpu mcu micro controller package smd tqfp tqfp44
a micro controller in a tqfp44 package
3d_export
$15

control unit
...control unit
3dexport
control unit
3ddd
$1

Yacht control
...yacht control
3ddd
yacht control
3d_export
$5

controle pgdm
...controle pgdm
3dexport
carcaca controle pgdm
turbosquid
free

controler
... available on turbo squid, the world's leading provider of digital 3d models for visualization, films, television, and games.
3ddd
$1

Control
...
http://www.schmitz-leuchten.de/html-ru/einzelleuchten-lampentyp-details.php?lamptype_no=700&group;=917&id;=731
3d_ocean
$4

Controller TQFP100
...100
3docean
chip computer cpu electronic gpu mcu micro controller pin platine silicon wafer
a micro controller in tqfp100 package
3d_ocean
$4

Controller TQFP64
...qfp64
3docean
chip computer cpu gpu mcu micro controller package silicon tqfp tqfp64 wafer
a micro controller in a tqfp64 package
3d_ocean
$7

Remote controller
... control switcher tv remote
remote controller for tv, sound systems etc easy to edit textures photo real rendered with mental ray
Controlling
3d_ocean
$4
Controller TQFP32
...qfp32
3docean
chip controller cpu electronic gpu mcu micro controller silicon smd tqfp wafer
a micro controller in tqfp32 package
3d_ocean
$4
Controller TQFP44
...44
3docean
chip controller cpu electronic gpu mcu micro controller package smd tqfp tqfp44
a micro controller in a tqfp44 package
3d_export
$15
control unit
...control unit
3dexport
control unit
3ddd
$1
Yacht control
...yacht control
3ddd
yacht control
3d_export
$5
controle pgdm
...controle pgdm
3dexport
carcaca controle pgdm
turbosquid
free
controler
... available on turbo squid, the world's leading provider of digital 3d models for visualization, films, television, and games.
3ddd
$1
Control
...
http://www.schmitz-leuchten.de/html-ru/einzelleuchten-lampentyp-details.php?lamptype_no=700&group;=917&id;=731
3d_ocean
$4
Controller TQFP100
...100
3docean
chip computer cpu electronic gpu mcu micro controller pin platine silicon wafer
a micro controller in tqfp100 package
3d_ocean
$4
Controller TQFP64
...qfp64
3docean
chip computer cpu gpu mcu micro controller package silicon tqfp tqfp64 wafer
a micro controller in a tqfp64 package
3d_ocean
$7
Remote controller
... control switcher tv remote
remote controller for tv, sound systems etc easy to edit textures photo real rendered with mental ray
Air
3ddd
$1

Calligaris air
...calligaris air
3ddd
air , calligaris
cтул calligaris air
3ddd
$1

Air freshener
...air freshener
3ddd
air freshener , освежитель
air freshener
design_connected
$16

Air
...air
designconnected
flexform air lounge chairs computer generated 3d model. designed by antonio citterio.
turbosquid
$250

Heat pump air air
... available on turbo squid, the world's leading provider of digital 3d models for visualization, films, television, and games.
3d_export
$5

air
...air
3dexport
3ddd
$1

Кухня AIR
...кухня air
3ddd
air , мария
кухня air фабрики "мария"
3ddd
$1

Лампа AIR
...лампа air
3ddd
boconcept , air
настольная лампа air, boconcept. в50½xø32см
3d_export
$40

air deflector
...air deflector
3dexport
air deflector
3d_export
$15

air purifier
...air purifier
3dexport
air purifier
3d_export
$5

macbook air
...macbook air
3dexport
macbook air