Thingiverse

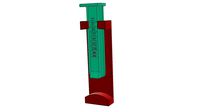
Filament Run Out Sensor - Lack Enclosure by Mattwall
by Thingiverse
Last crawled date: 3 years, 1 month ago
This is my filament run out sensor and guide tube for my lack printing enclosure. you'll also need 2 M3 screws x 12mm (although I used one 8mm long and one 12mm long), a limit switch with wheel like the image, a couple of short pieces of Boden tube, 2 extruder end Boden tube couplers (M6 thread), a small zip tie and enough wire to reach your main board. I'm not going to go over the firmware settings or connections to main board here as they are very well documented elsewhere and this is more about this design of sensor rather than a tutorial on how to add a filament sensor.
Once the main section has been printed, screw in the 2 Boden couplers and push in the short lengths of tube. Using one of the M3 screws mount the limit switch using the hole a the switch end (I had to slightly open up the hole in the switch itself to be free on the M3 screw), it should self tap as it goes in, don't fully tighten as the limit switch should have some movement. Add the other screw to the lower hole and this will be used for adjusting the senor. Use the small zip tie to secure the wires. Finally push in some filament as we need to adjust the switch position by using the lower screw until it clicks when filament is both inserted and removed.
Once the main section has been printed, screw in the 2 Boden couplers and push in the short lengths of tube. Using one of the M3 screws mount the limit switch using the hole a the switch end (I had to slightly open up the hole in the switch itself to be free on the M3 screw), it should self tap as it goes in, don't fully tighten as the limit switch should have some movement. Add the other screw to the lower hole and this will be used for adjusting the senor. Use the small zip tie to secure the wires. Finally push in some filament as we need to adjust the switch position by using the lower screw until it clicks when filament is both inserted and removed.
Similar models
thingiverse
free

Creality CR-6 SE PFTE Cable Guide for Filament Sensor by michaelbourque
...
use this with m3 x 25mm screws to attach to top of cr-6 se filament sensor. screw in a pfte tube coupler and a short pfte tube.
thingiverse
free

Prusa i3 MK2 boden holder cap by Crunch3D
...or the filament and so i could use a full boden tube to the extruder.
now it only helps to stabilize the angle from the filament.
thingiverse
free

Adjustable filament sensor with PTFE tube
...ube
thingiverse
filament sensor with ptfe tube for micro roller switch.
sensor is adjustable with min m3x12 screw and 2 m3 nuts.
thingiverse
free

Ikea Lack Filament Runout Sensor and Guide by ebiiii
...stop switch to build a filament runout sensor and guide for my ikea lack.
it uses an m6 bowden coupler on the top and the bottom.
thingiverse
free

Filament sensor with Ender endstop
... end of the metal arm so that the button is pushed down when the filament unloads. better test this before installing the sensor.
thingiverse
free

GT2 Belt Clamp - Zip Tie or M3 Screw by trg3dp
...se
uses 1mm zip ties or m3 screws to clamp gt2 belts to any surface with 12mm spaced holes. this was for my anet a8 heated bed.
thingiverse
free

Ender 3 v2 EZOut Filament Sensor Clip on Mount by 7FFFFFFF
...is in mind.
due to the thickness of the mount, i had to use longer m3 * 12mm screws to mount it on the z-axis lead screw guide.
thingiverse
free

simple IKEA LACK Filament Guide 12mm by srvnk
...by srvnk
thingiverse
print the filament guide.
drill 12mm hole in your ikea lack table.
push guide in the hole.
simple and good.
thingiverse
free

Lack Filament Sensor by mSenyor
...nyor
thingiverse
this is a microswitch filament sensor mount i've made for the ikea lack enclosure.
it takes 1 kw-12 switch.
thingiverse
free

Boden Tube Holder x6 by ToxicTeaParty
...en tubes in place on the underside of an ikea lack enclosure so you can easily swap between filaments that you have in a dry box.
Mattwall
thingiverse
free

Battleship Game Spare Ships by Mattwall
.... they have a 13.5mm pitch between holes/pins and the pins are 3.5mm diameter and 4mm long. print the right way up with supports.
thingiverse
free

Golf Ball Marking Tool by Mattwall
...ttachment hole so it can be added to a key ring or clipped to golf bag etc.
no supports required and can be done in any material.
thingiverse
free

Battery Storage Box - Yet another by Mattwall
...piration for this. (my print quality is not the best as i had it set to a fast print speed and my slicer settings need some work)
thingiverse
free

DSO138 Mini Case by Mattwall
... either way up (it depends on what finish you prefer on the top) just remenber to add supports if you print with the top upwards.
thingiverse
free

MakerHawk Camera Mount Raspberry Pi by Mattwall
...up in the air and with supports. (opposite to how it loads)
the upper housing can be laid flat and doesn't need any supports.
thingiverse
free

Simple Folding Phone Stand by Mattwall
...this was designed from scratch however, the inspiration came from this very good design https://www.thingiverse.com/thing:2377538
thingiverse
free

Satsana Ender 3 Fan Duct - BLTouch by Mattwall
...les can exit on the other side. i just preferred them there as they matched up with the wires i already had for the direct drive)
thingiverse
free

Lamborghini Disc Brake Wall Clock by Mattwall
... the wood screws and the spacer goes over the centre of the clock mechanism.
hopefully that's easy enough to follow????
enjoy
thingiverse
free

Ender 3 Tool Holder with caliper and extra support by msubira
...msubira thingiverse remix of ender 3 tool holder by mattwall with caliper support and estra suport for...
thingiverse
free

Bottle Opener and Cap Gun - Remix by Mattwall
...they won't tighten against a stop so just stop when they are flush).
hope you like the minor tweak to an already great design
Lack
3d_export
$5

LACK LACK Coffee table white 90x55 cm IKEA
..., white, 90x55 cm ikea<br>https://www.ikea.com/ru/ru/p/lack-lakk-zhurnalnyy-stol-belyy-50449907/?ysclid=l8zshj49w6656165430
turbosquid
$4

Ikea Lack
... available on turbo squid, the world's leading provider of digital 3d models for visualization, films, television, and games.
3ddd
$1

IKEA Lack Coffee Table
... кофейный
ikea lack coffee tablehttp://www.ikea.com/gb/en/catalog/products/00104291
turbosquid
$5

IKEA Lack Table
...ack table for download as blend, blend, unitypackage, and fbx on turbosquid: 3d models for games, architecture, videos. (1623135)
turbosquid
$10

Ikea Lack Set
... available on turbo squid, the world's leading provider of digital 3d models for visualization, films, television, and games.
turbosquid
$3

IKEA Lack Library
... available on turbo squid, the world's leading provider of digital 3d models for visualization, films, television, and games.
turbosquid
$1

IKEA LACK TABLE
... available on turbo squid, the world's leading provider of digital 3d models for visualization, films, television, and games.
turbosquid
free

IKEA Lack Shelf
... available on turbo squid, the world's leading provider of digital 3d models for visualization, films, television, and games.
turbosquid
$9

Ikea Table 5 Lack
... available on turbo squid, the world's leading provider of digital 3d models for visualization, films, television, and games.
turbosquid
$5

IKEA Lack Side Table
... available on turbo squid, the world's leading provider of digital 3d models for visualization, films, television, and games.
Enclosure
3d_export
free

electrical enclosure
...l enclosure where electrical devices like (relays, contactors, busbars ) are kept in order to protect from hazardous environment.
turbosquid
$100

GPU Enclosure
...yalty free 3d model gpu enclosure for download as obj and stl on turbosquid: 3d models for games, architecture, videos. (1381061)
3d_export
$5

Electrical Enclosure
...ed. also has tower lights attaced on the top.<br>file format that are available:<br>.step<br>.obj<br>.stl
archive3d
free

Enclosure 3D Model
...closure 3d model
archive3d
shower enclosure-acquarius- 3d model for interior 3d visualization.
archive3d
free

Enclosure 3D Model
...enclosure 3d model
archive3d
shower enclosure-omega- 3d model for interior 3d visualization.
archive3d
free

Enclosure 3D Model
...enclosure 3d model
archive3d
shower enclosure-vega - 3d model for interior 3d visualization.
archive3d
free

Enclosure 3D Model
...enclosure 3d model
archive3d
shower enclosure-zenith - 3d model for interior 3d visualization.
turbosquid
$20

shower enclosure
... available on turbo squid, the world's leading provider of digital 3d models for visualization, films, television, and games.
turbosquid
$14

Dumpster Enclosure
... available on turbo squid, the world's leading provider of digital 3d models for visualization, films, television, and games.
turbosquid
$25

3d printer enclosure
... model 3d printer enclosure for download as ipt, skp, and fbx on turbosquid: 3d models for games, architecture, videos. (1634310)
Sensor
3d_export
free

parking sensor
...parking sensor
3dexport
car parking sensor
turbosquid
$1

Sensor
... available on turbo squid, the world's leading provider of digital 3d models for visualization, films, television, and games.
3d_export
$5

Smoke sensor
...port
smoke sensor, can be an impressive element for your projects. easy to use, realistic image, low polygon, quality materials.
3d_export
$5

Air Quality Sensor v1
...air quality sensor v1
3dexport
air quality sensor v1
3d_export
$15

float sensor
...e up render. - all parts and materials are logically named. other formats ================= - collada (.dae) - autodesk fbx - obj
turbosquid
$26

Wind sensor C
...free 3d model wind sensor c for download as 3ds, obj, and fbx on turbosquid: 3d models for games, architecture, videos. (1328943)
turbosquid
$26

Wind sensor B
...free 3d model wind sensor b for download as 3ds, obj, and fbx on turbosquid: 3d models for games, architecture, videos. (1328168)
3d_export
$5

ultrasound sensor
...ivers convert ultrasound into electrical signals, and transceivers can both transmit and receive ultrasound. export in: -obj -fbx
3ddd
free

Вытяжка Shindo pallada sensor
... вытяжка
вытяжка shindo pallada sensor. в двух размерах - 600 и 900. текстуры в комплекте.
turbosquid
$52

Wind sensor A B C
...
royalty free 3d model wind sensor a b c for download as fbx on turbosquid: 3d models for games, architecture, videos. (1408406)
Run
turbosquid
$2

Run
... available on turbo squid, the world's leading provider of digital 3d models for visualization, films, television, and games.
design_connected
$20

Run Personal
...run personal
designconnected
technogym run personal computer generated 3d model. designed by citterio, antonio.
turbosquid
$49

Elf running
...osquid
royalty free 3d model elf running for download as fbx on turbosquid: 3d models for games, architecture, videos. (1500360)
turbosquid
$20

running machine
...id
royalty free 3d model running machine for download as fbx on turbosquid: 3d models for games, architecture, videos. (1207171)
turbosquid
$4

Zombie Running
...uid
royalty free 3d model zombie running for download as obj on turbosquid: 3d models for games, architecture, videos. (1241889)
turbosquid
$40

Fox, Running
... available on turbo squid, the world's leading provider of digital 3d models for visualization, films, television, and games.
turbosquid
$20

Soldier run
... available on turbo squid, the world's leading provider of digital 3d models for visualization, films, television, and games.
turbosquid
$12

Running Man
... available on turbo squid, the world's leading provider of digital 3d models for visualization, films, television, and games.
turbosquid
$2

Skeleton Running
...eleton running for download as blend, fbx, obj, gltf, and dae on turbosquid: 3d models for games, architecture, videos. (1589546)
3d_ocean
$19

Running shoes
...imated .textures and materials are included in (others jpg file) the snapshots was rendered using the vray version of the file...
Filament
3ddd
$1

Filament Cage
...filament cage
3ddd
лофт , filament cage
модель бра, делалась по фото!
turbosquid
$3
FILAMENT COUNTER
...d
royalty free 3d model filament counter for download as stl on turbosquid: 3d models for games, architecture, videos. (1563049)
3d_export
$5

Filament lamp 3D Model
...filament lamp 3d model
3dexport
filament lamp 3d model kevin 54161 3dexport
3d_export
$5

Filament bulb candle 3D Model
...filament bulb candle 3d model
3dexport
filament bulb-candle
filament bulb candle 3d model kevin 54163 3dexport
3d_export
$5
Filament led light bulb
...filament led light bulb
3dexport
realistic 3d model of filament light bulb with v-ray materials.
3d_export
$5
Filament led light bulb
...filament led light bulb
3dexport
realistic 3d model of filament light bulb with v-ray materials.
3d_export
$5

Filament led light bulb
...filament led light bulb
3dexport
realistic 3d model of filament light bulb with v-ray materials.
3d_export
$5
Filament led light bulb
...filament led light bulb
3dexport
realistic 3d model of filament light bulb with v-ray materials.
3d_export
$5
Filament led light bulb
...filament led light bulb
3dexport
realistic 3d model of filament light bulb with v-ray materials.
3ddd
$1
Factory filament metal shade
...factory filament metal shade
3ddd
restoration hardware
restoration hardware. 20th c. factory filament metal shade.